There are two easy ways to adjust margins in Google Docs, and both methods have their own advantage. In this post, I’ll show these two methods to change margins in Google Docs.
Use the ruler to change margins in Google Docs
Google Docs has a built-in ruler to adjust sides, top, and bottom margins. If it isn’t already available at the top and left corner, then you can enable it by going to View > Show ruler. You can freely adjust the margins on the rulers and see the results in real-time. If you need to experiment a bit to find the perfect margin ratio for your document, then this method is for you. First, let’s adjust the side margins. I am assuming you are adjusting margins on an empty document. However, if there is content in your document, then you should select (highlight) all of it first before changing margins. On the top ruler, there are two triangular sliders on both left and right sides that you can use to adjust the margins. Just click and hold on the left slider and move it towards the right side to increase the left margin. Similarly, grab the right slider and move towards the left side to increase the right margin.
Note: There is a rectangular slider above the left slider which is used for adjusting the margin of only the first line of each paragraph. If you don’t want to do this, then make sure you grab the left slider by clicking on the triangle slider. There are no visible sliders on the left ruler to adjust the top and bottom margins. Although there are gray and white sections on the ruler, where the white area shows the editable area and the gray area is blank space. To adjust these margins, just click and hold the exact area where these gray and white sections intersect. Now, you can freely move it to increase or decrease the margins.
Use Page setup to change margins in Google Docs
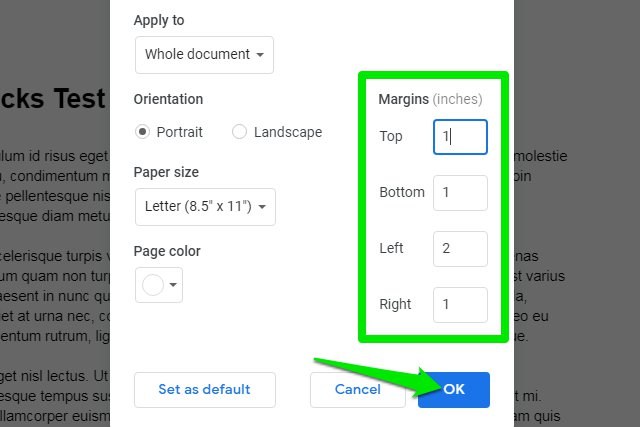
If you want a bit more precise method, specifically, if there are specific margin values you need to follow; then using page setup is much better. In the page setup, you can provide exact margin sizes in inches. However, the changes can’t be seen in real-time, so it’s not a good option for experimenting with margin sizes. To access it, click on the File menu in the top bar and select “Page setup” from the menu. There is a “Margins” section here where you can enter the top, bottom, left, and right margins in inches. Just enter the required values and hit the “OK” button to apply the changes.
That’s it, the select margins will be immediately applied to the whole document unless you have specific lines selected. Tip: If you need to use specific margins every time you create a document, then you can also set new margin values as default. All you need to do is click the “Set as default” button on the Page setup when you are done adding the new margin values.
Wrapping up
In my opinion, using the ruler is the easiest method to change margins in Google Docs. It’s really easy to see the changes in real-time, and honestly, it isn’t too difficult to apply specific margin values as you can see them on the ruler. Although adjusting from page setup is definitely less confusing and it also gives you the option to make the changes permanent.